Front Splits: How to Find Which Muscle Is Holding You Back (and What to Do)
Most people chasing a front split stretch everything and progress slowly. The faster path is to identify the capacity that gives out first and train it specifically. Hamstring and hip-flexor length are the two primary mobility restrictions, but active strength, pelvic control, adductor range and ankle mobility can also affect how safely and squarely you hold the position.
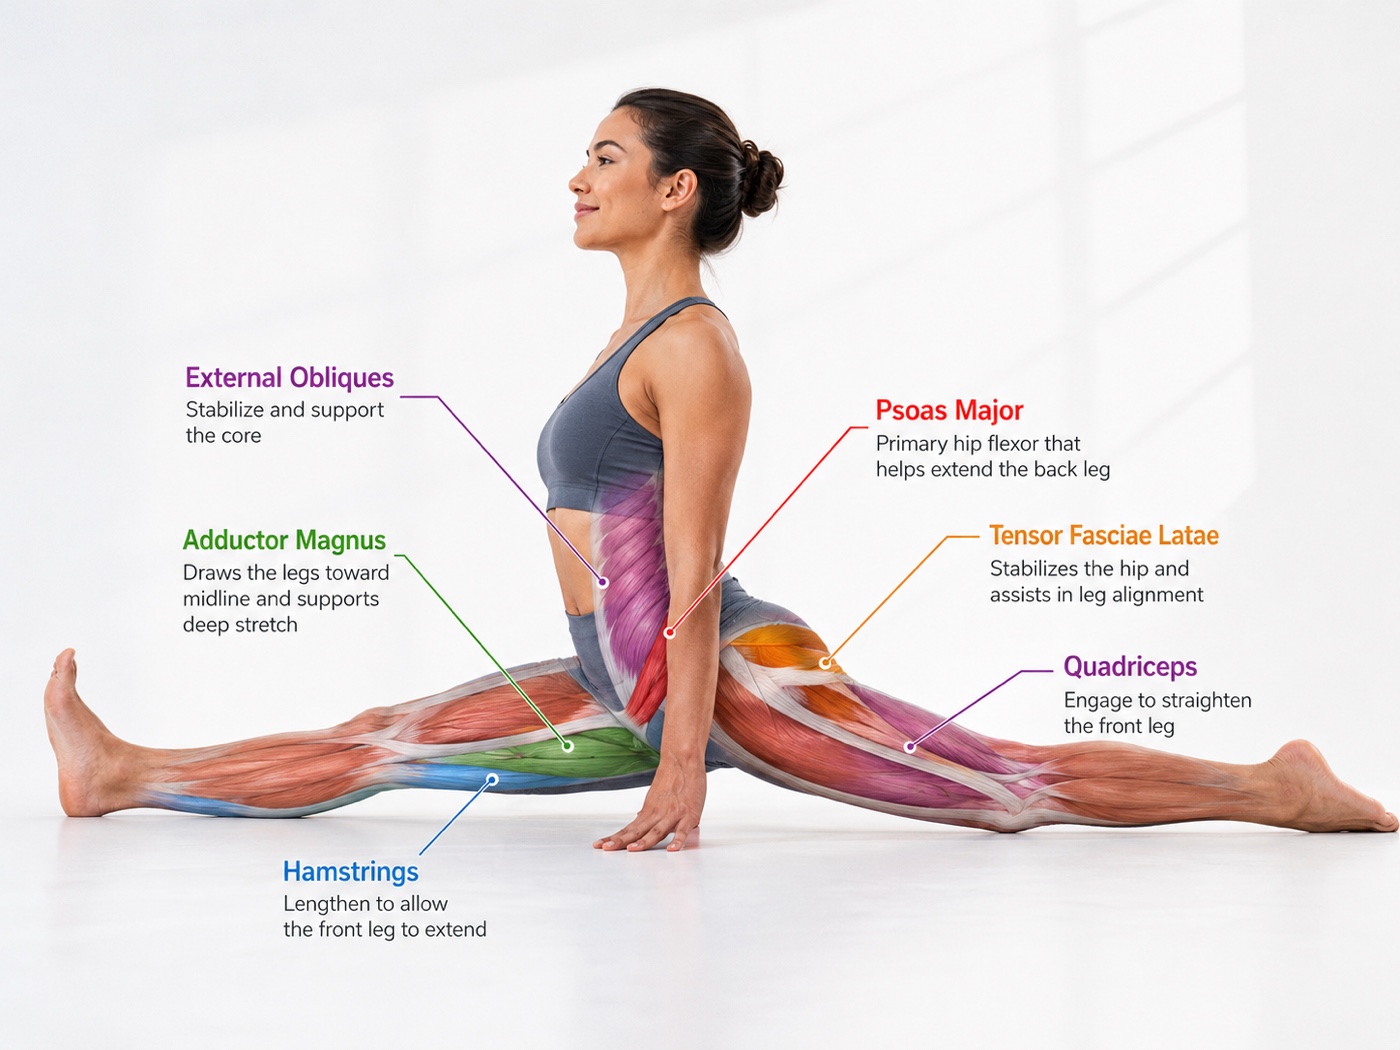
The two primary mobility limiters
A front split is one leg reaching forward and the other reaching back. Each direction is capped by a different muscle group:
- Front-leg hamstrings. As the front leg slides forward, the hamstrings lengthen. If they're the limiter, you'll feel the stretch in the back of the front thigh.
- Back-leg hip flexors. As the back leg slides back, the hip flexors (iliopsoas and rectus femoris) lengthen. If they're the limiter, you'll feel the stretch in the front of the back hip/thigh.
A smaller number of people are limited by the adductors (felt on the inner thigh) — more typical of the middle split, but worth ruling in. The full readiness assessment also checks active hip, quadriceps and glute strength, core control and ankle dorsiflexion because these capacities help you control the range rather than simply drop into it.
The 60-second self-test
Ease into a split as far as you comfortably can, keeping your hips square and facing forward. Then ask one question: where do you feel the deepest stretch — and what stops you going lower?
| Where you feel it | Likely limiter | Train this |
|---|---|---|
| Back of the front thigh | Hamstrings | Hamstring work |
| Front of the back hip/thigh | Hip flexors | Hip flexor work |
| Inner thigh | Adductors | Adductor / groin work |
Repeat with the other leg forward — most people are noticeably more limited (and often more limited by a different tissue) on one side.
What to do for each limiter
If hamstrings limit you
Train end-range hamstring length, not just "feel-good" stretching:
- Standing elevated hamstring stretch — use contract-relax work to gain range.
- Add active straight-leg work to own the new range.
Review the hamstrings muscle guide for anatomy cues and common compensations.
If hip flexors limit you
- Use a kneeling runner's lunge for iliopsoas length with an upright trunk.
- Add a controlled couch stretch to train deeper hip-flexor and rectus-femoris length while keeping the pelvis and ribs stacked.
The iliopsoas is usually the deeper brake on the back leg — especially if you sit for long stretches during the day.
If adductors limit you
Work the inner-thigh range with controlled groin stretches from the hip library, progressing depth slowly.
Common mistakes and how to progress safely
Chasing depth with a rotated pelvis. If your hips open to the side or your back leg bends, you aren't training the limiter — you're borrowing range from elsewhere. Keep hips square even if that means staying higher for a while.
Stretching both legs equally when only one is the bottleneck. Your left and right limiters often differ. Train the tight side more, not symmetrically "just because."
Ballistic bouncing at end range. Fast pulses trigger a protective stretch reflex. Hold mild tension for 30–60 seconds, or use PIR where you briefly contract then relax deeper.
Skipping strength. Flexibility without control is fragile. Light posture and core work — especially hip extension and anti-rotation — helps you use new range. A few minutes of standing balance and alignment drills before split work can also reduce cheating.
Training through sharp pain. Dull, workable tension is fine; pinching at the front of the hip or behind the knee is not. Back off, reset square hips, and build volume at a shallower depth first.
Progress by adding one small increment per session — a fraction lower, five seconds longer, or one extra set — rather than forcing a full split once a week.
Warm up with five minutes of easy movement — walking, leg swings, or light hip region mobility — so you're not cold-testing end range. Log which limiter showed up each week; when the deepest stretch shifts from hamstring to hip flexor (or vice versa), switch emphasis. That hand-off is normal as one tissue opens and the next becomes the gate.
Build it into a plan
Identify your limiter, train it 4–6 days a week at the edge of your range (mild tension, never pain), and re-test every couple of weeks. The Front-Split Readiness program combines the assessment with a personalized mobility, strength and control plan.
 Free programFront SplitsAssess your split limiters and follow a targeted, personalized mobility + strength plan.Assess your split →
How long does it take?
For most adults training consistently, a front split is a multi-month project — often three to nine months, depending on starting range, training frequency, and how precisely you target the limiter. Targeting your actual bottleneck — rather than stretching indiscriminately — is the single biggest accelerator. When progress stalls, re-run the 60-second self-test; the limiter often changes as the first tissue opens.
Sources
This article draws on established clinical references:
- Joint Range of Motion and Muscle Length Testing — Reese & Bandy
- Assessment and Treatment of Muscle Imbalance: The Janda Approach — Page, Frank & Lardner
- Muscles: Testing and Function, with Posture and Pain (5th ed.) — Kendall, McCreary, Provance, Rodgers & Romani
Train at the edge, not into pain. Flexibility gains come from frequent, sub-maximal end-range work. Sharp pain is a signal to back off.