Deadlift Posture: How to Keep a Neutral Spine and Lift Safely
Deadlift posture is the foundation of safe pulling: a stable neutral spine deadlift setup, a clean hip hinge, and a bar path that stays close to your body. Good deadlift form is not about looking dramatic — it is about letting your spine hold its natural curves while your hips and legs do the work. Whether you pull from the floor or from blocks, the same principles apply: brace, hinge, and keep the back from rounding or over-arching under load.
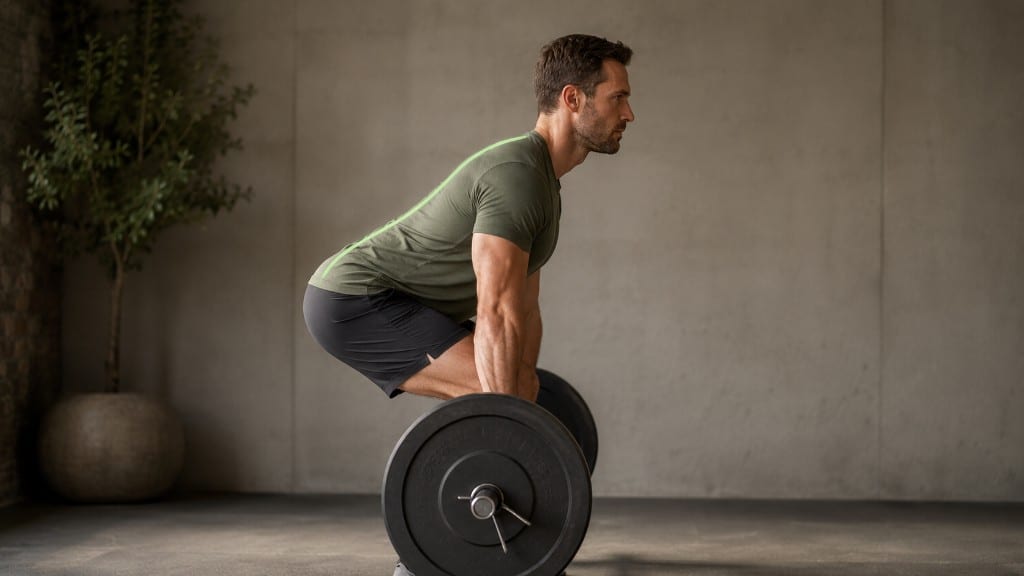
What good deadlift posture looks like
Before the bar leaves the ground, your body should look like a loaded spring — coiled through the hips, not folded through the lower back.
Bar over midfoot. The bar should sit over the middle of your foot, not toward your toes or heels. That keeps the load stacked over your base of support.
Hip hinge, not a squat. The deadlift is a hinge: your hips move back, your knees bend only as much as needed, and your torso stays relatively fixed as one unit. Think of closing a door with your hips rather than sitting straight down.
Neutral spine. A neutral spine deadlift keeps the natural inward curve at the lower back and the gentle outward curve at the upper back. The spine should not round (flex) or crank into excessive extension (over-arch) as you pull. Under load, the job of the trunk is to hold position, not to move.
Core braced. Before you pull, create 360-degree trunk stiffness — often described as "bracing" — so pressure builds evenly around your midsection. That shares force between your abdominals, back extensors, and the rest of the trunk rather than concentrating it on one segment.
Bar close. The bar should stay within an inch or so of your shins and thighs throughout the lift. A bar that drifts forward increases leverage on the spine and makes a neutral position harder to keep.
Physical therapist and coach Aaron Horschig, author of Rebuilding Milo, frames this well: treat the deadlift as a hip-dominant pattern where the spine is a rigid link and the hips are the engine. That mindset — stable trunk, mobile hips — is the through-line of sound pulling.
Why the spine should stay still under load
Your lumbar erector spinae and erector spinae along the whole back are built to resist flexion and extension, not to repeatedly bend under heavy load. When the lower back rounds, stress concentrates on passive structures; when it over-arches, the facet joints and ribs can take more compression than you want.
The muscles that should drive the lift sit elsewhere:
| Muscle group | Role in the deadlift |
|---|---|
| Hamstrings | Lengthen under control at the bottom; help extend the hip on the way up |
| Gluteals | Primary hip extensors — they finish the lockout |
| Lumbar erector spinae | Isometrically stabilizes the lower back; should not visibly change shape |
| Hip flexors | Must allow enough mobility to reach the bar without compensating through the spine |
Explore how these regions interact in our lumbar, hip, and core hubs.
Mobility that lets you reach the bar
Many "bad deadlift posture" problems are really mobility problems. If your hamstrings are short, your pelvis may tuck and your lower back rounds to reach the bar. If your upper back is stiff, your chest drops and your shoulders round forward.
Address the limiters before you add weight:
- Hamstrings PIR stretch — lengthens the posterior chain so you can hinge without rounding.
- Thoracic peanut mobilization — restores extension in the upper back so your chest can stay up.
- Ankle banded calf work — better ankle dorsiflexion lets your shins travel forward without the hips sitting too high or the back compensating.
If you tend toward an exaggerated lower-back arch at setup, read how pelvic position and bracing interact in anterior pelvic tilt — the same awareness helps you find neutral before you load.
Deadlift setup checklist
Run through this sequence every time you approach the bar:
- Foot position — midfoot under the bar; feet hip-width or slightly wider depending on your build.
- Grip — hands just outside the legs; lats engaged so the bar stays close.
- Hip hinge — push hips back until hands reach the bar; shins nearly vertical.
- Neutral spine check — natural lower-back curve, chest up without flaring ribs, neck in line with spine.
- Brace — full trunk tension before you pull slack out of the bar.
- Pull — drive through the floor, hips and shoulders rise together; lock out with glutes, not by leaning back.
Film yourself from the side. The spine angle from setup to lockout should change very little; the hips should travel the most.
Common deadlift form mistakes
Rounded lower back. Usually from pulling before you are braced, using weight you cannot control, or lacking hamstring and hip mobility. Drop load, fix setup, and mobilize.
Over-arching ("stripper deadlift"). Excessive lumbar extension at lockout shifts stress off the glutes and onto the lower back. Finish tall through the hips without leaning back.
Bar drifting forward. Often from loose lats or starting with the bar too far from the shins. Reset closer and pull the bar into your legs.
Hips shooting up first. The chest drops and the back rounds. Reduce weight and cue "chest up" while pushing the floor away.
Building deadlift posture into your training
Posture off the platform affects posture on it. General alignment work — the kind outlined in how to fix posture — supports better hinge mechanics. Pair deadlift practice with hip and thoracic mobility on non-max days, and treat every warm-up set as a form rehearsal.
This article is general education. For heavy loading, pain, or a history of back injury, work with a qualified coach or clinician who can watch you move and progress load safely.
Sources
This article draws on established clinical references:
- Rebuilding Milo — Aaron Horschig
- Muscles: Testing and Function, with Posture and Pain (5th ed.) — Kendall, McCreary, Provance, Rodgers & Romani
Wellness, not medical advice. This article is educational. If you have pain, numbness, or a medical concern, see a qualified clinician.